
At 2302 yards, the par 34 layout will not overpower shorter hitters, but don't be fooled by the length alone. With narrow tree-lined fairways, plenty of elevation changes and well protected tiered greens, the course can provide a challenge for even the most experienced golfers. As a result, it's a fun and playable layout for all skill levels.
LEGACY PINES GOLF CLUB - Par 34 (click hole image to enlarge)
Hole 1
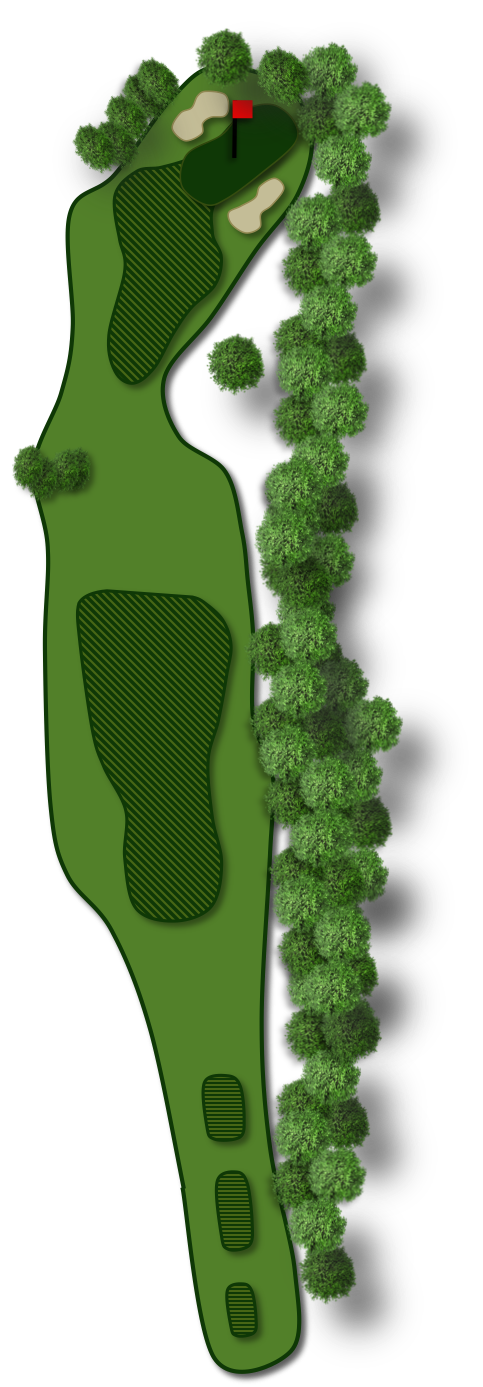
Par 4, 342 yards Men's Handicap 4 Ladies Handicap 3 A challenging opening hole where the correct position of your drive is critical for a chance at par. Select the right club off the tee to in order to position yourself close to end of the first section of an interrupted fairway, 130 -150 yards to the green. Try to keep to the left side of the fairway on your drive, as anything right may leave you a blind shot into a well protected green on this dog-leg right. |
1st Hole Flyover - click image to play.
|
|
2nd Hole Flyover - click image to play.
|
Hole 2
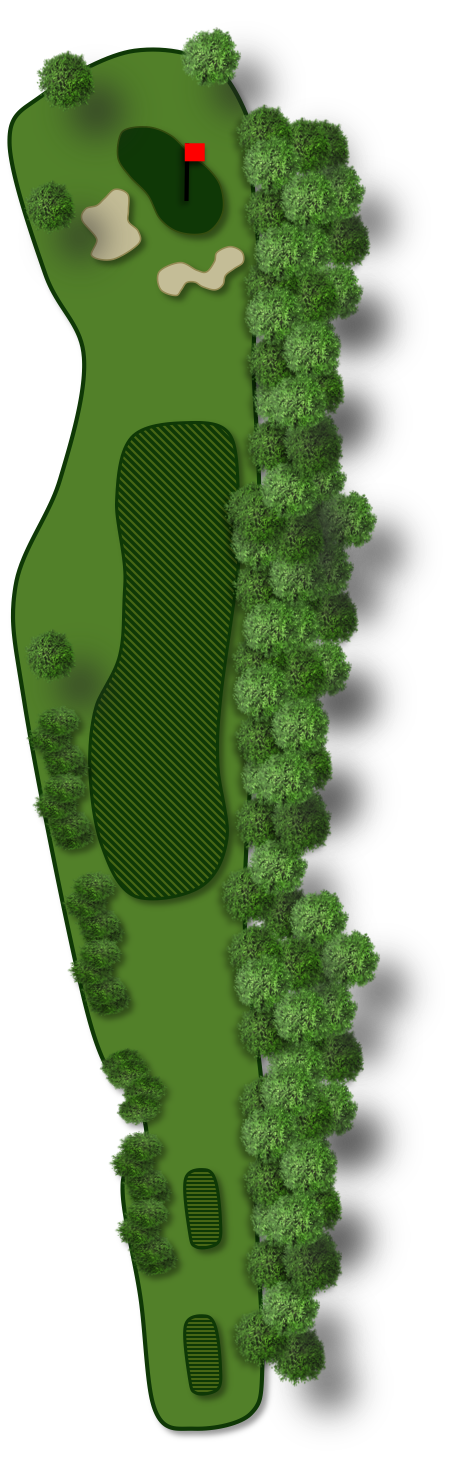
Par 4, 331 yards Men's Handicap 3 Ladies Handicap 2 A narrow fairway with out-of-bounds on the right requires an accurate drive on this hole. Two large bunkers that you will need to carry protect the front of the green. The wide but fairly shallow tiered green slopes severely from right to left, so note the pin position and adjust accordingly. |
|
Hole 3
Par 4, 326 yards Men's Handicap 1 Ladies Handicap 1 Out of bounds left and right off the tee, means that finding the fairway with your drive here is critical. A forced carry over a large swale to a well protected, elevated green makes this the toughest hole on the course for most. A crescent shaped, tiered green with severe slope will reward an accurate approach shot. |
3rd Hole Flyover - click image to play.
|
|
4th Hole Flyover - click image to play.
|
Hole 4
Par 4, 221 yards Men's Handicap 5 Ladies Handicap 5 Short but tricky. Getting the right distance off the tee sets up this severe dog-leg right. Short or long can leave you blocked out from a view of the green, so try to hit to the landing area at the bottom of the hill. From here, it's an 80-90 yard shot across the pond to a small green surrounded by trees, leaving little room for error. Birdies are definitely in play on this short but tricky hole ... but, so are triple bogies. |
|
Hole 5
Par 3, 135 yards Men's Handicap 7 Ladies Handicap 7 An uphill tee shot makes this hole play longer than it looks, so consider taking an extra club. A large, deep bunker guards the left side of the green. Beware of the false front on the right side as well, as anything coming up short on the green here will likely be returned down the hill. |
5th Hole Flyover - click image to play.
|
|
6th Hole Flyover - click image to play.
|
Hole 6
Par 4, 305 yards Men's Handicap 2 Ladies Handicap 4 A straight drive will set you up well on this narrow, tree-lined, dog-leg left. Once at the bottom of the hill, the hole opens up to reveal another elevated and well protected green. The tiered green slopes significantly back-to-front, and the deep green-side bunker on the right definitely comes into play when the pin is on the upper tier. |
|
Hole 7
Par 4, 265 yards Men's Handicap 9 Ladies Handicap 9 This may be the easiest hole on the course, but makes sure to keep your drive away from the left side to avoid the out-of-bounds, or from being blocked out by trees on your second shot. Hitting to the large marker pole is always a safe play here and will leave you a fairly straight forward shot into the deep green. |
7th Hole Flyover - click image to play.
|
|
8th Hole Flyover - click image to play.
|
Hole 8
Par 4, 229 yards Men's Handicap 6 Ladies Handicap 6 The right club selection off the tee is critical here, as anything too long will be through the fairway and likely lost. Hitting to the corner on this short, dog-leg left sets you up well for a second shot through a narrow gap into the green. A tiered green that slopes severely left-to-right, rewards an accurate shot based on the pin placement. |
|
Hole 9
Par 3, 135 yards Men's Handicap 8 Ladies Handicap 8 The wind direction and the pin placement on this very large green can make a two to three club difference on this fairly straight forward finishing hole. Stay away from the three bunkers that guard the green, or making par on this final hole will be challenging. |
9th Hole Flyover - click image to play.
|
|
|
VISIT US
9 Zimmerman Drive Caledon, ON L7E4C2 |